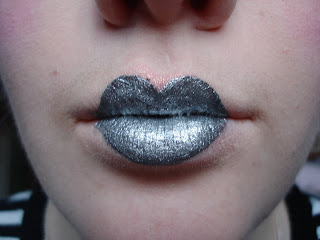
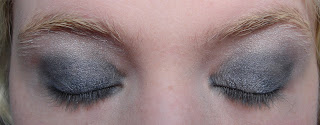
Yesterday I wanted to do a really fun, avant-garde inspired FOTD with my Illamasqua products. I decided to take my inspiration from their Dystopia collection and the images they promoted it with and combine it with a 1920s flapper look. As it's unusual and fun i thought i'd try to do my first proper tutorial with pictures.

Face: Gosh foundation in Porcelain, Screen face white translucent powder, Illamasqua Illuminator in Fondle, Dainty Doll concealer in Fair.
Eyes: Illamasqua Illuminator in Odyssey, Illamasqua powder eyeshadows in , kajal liner (unsure of brand, thanks Rhamnousia!), Lancome Oscillation mascara.
Lips: Barry M lipstick in 37 (black), Nyx lip liner in blackberry, Illamasqua Intense Lipgloss in Galactic
So if you'd like to learn how to do this tutorial please read below the cut :)

So here's the start, i used my GOSH foundation everywhere as per usual, concealered under my eyes and around my nose and then blocked out my lips with some Mac Lip Erase followed by a bit more foundation (if you don't have Lip Erase or any special lip blocking thing you could just use concealer or foundation.)

Then i powdered my face using a white translucent powder, which makes me look even paler then i am naturally. You could use your ordinary powder though but if you want to try this but don't own a white face powder you can use talcum/baby powder (though this will look a lot cakier than powder meant for the face so it might be best just to use this for fun). Then i used Illamasqua Illuminator in Fondle as a blush. The traditional blush look of the 1920s is a circle high on the apples of your cheeks in a red or pink colour, so i applied the blush in the same place and shape but used the pink and gold highlighter to make it a bit more interesting and to go with my Dystopia collection look. I also applied a very small amount of the illuminator just above my cupids bow.

Then i started on my eyes. I used Illamasqua Illuminator in Odyssey all over my lids to act as a slightly shimmery base as well as a brow-bone highlight. Then i took Illamasqua powder eyeshadow in Quantum over my lid and into the outer corner of my socket line in a rounded shape.

Then i used Illamasqua powder eyeshadow in Matter over the top to darken, but did not extend it as far above my socket line as the lighter shade. I added a line of the olour to my lower lash line and joined it up with the upper eye colour. I blended it a very small amount.
Finally i used a Kajal eyeliner to lightly line my upper and lower waterlines and added a small amount to the outer corner of my upper lashline too. I finished off with lots of mascara.

Finally i covered the lips with Illamasqua Intense Lipgloss in Galactic. As this is so opaque it covers the black completely, so if you're handier with a lipbrush than me you could skip the step before this :)
And here's the finished look again. I think i did an ok job and really like the idea of the look but there are things that could be better. I'm really rusty at cupids-bow lips (i used to do them all the time) and was not happy how wonky and asymmetrical they turned out. Also i was going to do something with my eyebrows and forgot so i don't know how that would have turned out.
Hope you enjoyed reading this!
MWAH!!!


You do cupid's bow lips so much better than I do! Mine always look weird and unnatural.
ReplyDeleteNice tutorial! You explained everything really clearly :)
I utterly adore this look! You're like an intergalatic flapper girl from outer space. :D So cute!
ReplyDeleteI love your lips! I thought that it was a pigment that you used becuase of how opaque it was!
ReplyDeleteLove this look, particularly like the way the black and silver work together on the lips. Great job!
ReplyDeleteoh wow wow wow,
ReplyDeletethis is my favourite look of yours EVER!
seriosly amazing
SWOON
x
This is such a good look. I want to do it. :D
ReplyDeleteThis look could totally be worn to the goth clubs. Looks lovely on you. :-D
ReplyDeleteDuuuuude, you should be an alt model :)
ReplyDeleteThis is probably going to sound weird, but the silver lips look awesome with your pale/icy eyes.
RaeRae:
ReplyDeleteAww thank you! It was fun photographing the steps :)
I used to be an expert at the cupids bow lips, i would wear them everyday, now i'm still ok but i'm just not as good as i was.
Emily:
Awww thank you so much! A space-age flapper was what i was going for! :D
Y:
Thank you! You could probably replicate it well with a pigment actually, but nope, it's the worlds most amazing lipgloss!
Sparklz and Shine:
Thank you!
*speed-queen*:
Awww thank you so much! I think this is the most fun and odd look i've done (except some of my contest entries, but they weren't really wearable at all) so i'm so glad you liked it! :)
Bicky:
:D if you do you have to show me photos!
BLIX:
Thank you! I'm going dancing tomorrow night and i'm thinking of adapting the look :)
SilhouetteScreams:
Awww bless you! I don't think i take photography direction very well :P
Doesn't sound weird to me, i actually agree, i think the silver makes my eyes look more grey than usual and that's fun for me :)
This is soooo cool! I love the silver lips with the dark eyes!
ReplyDeleteLove this look - and your clara bow lips are fab!
ReplyDeleteCoolest tute!
ReplyDelete